Showing posts with label sewing class. Show all posts

Wednesday, July 10, 2013

Sewing Class: Make Your Own Shorts Pattern

Have you ever wanted to sew something but didn't have a pattern? Have you ever wanted to make your own? I bet it's much easier than you think it is. I made a pair of shorts in about an hour, including making the pattern. I will show you how but only if you give it a try. ;)


Here is what you will need:
-a pair of shorts that fit the person you are making the shorts for
-a pencil
-a ruler
-paper (I prefer tissue paper. It comes in big sheets and is easy to pin.)


Turn your shorts inside-out and fold them in half. Line the long side of your shorts up with the edge of your paper. Using your ruler, trace your shorts leaving 1/2" seam allowance. I left 1" at the bottom for the hem and 1 1/2" at the top for the waistband.


And there you go! You have a pattern. It's a good idea to mark the size and top and bottom of your pattern, for future reference.


Now, to use your pattern. Cut two pieces with the long side of your pattern on a fold. Sew the two leg seams. I used a serger because I used knit fabric and wanted to have room to stretch. You can use a regular stitch.


Turn one piece right side out and slip it into the other. Line up the centers and pin. Now sew all the way around.


You should have this.


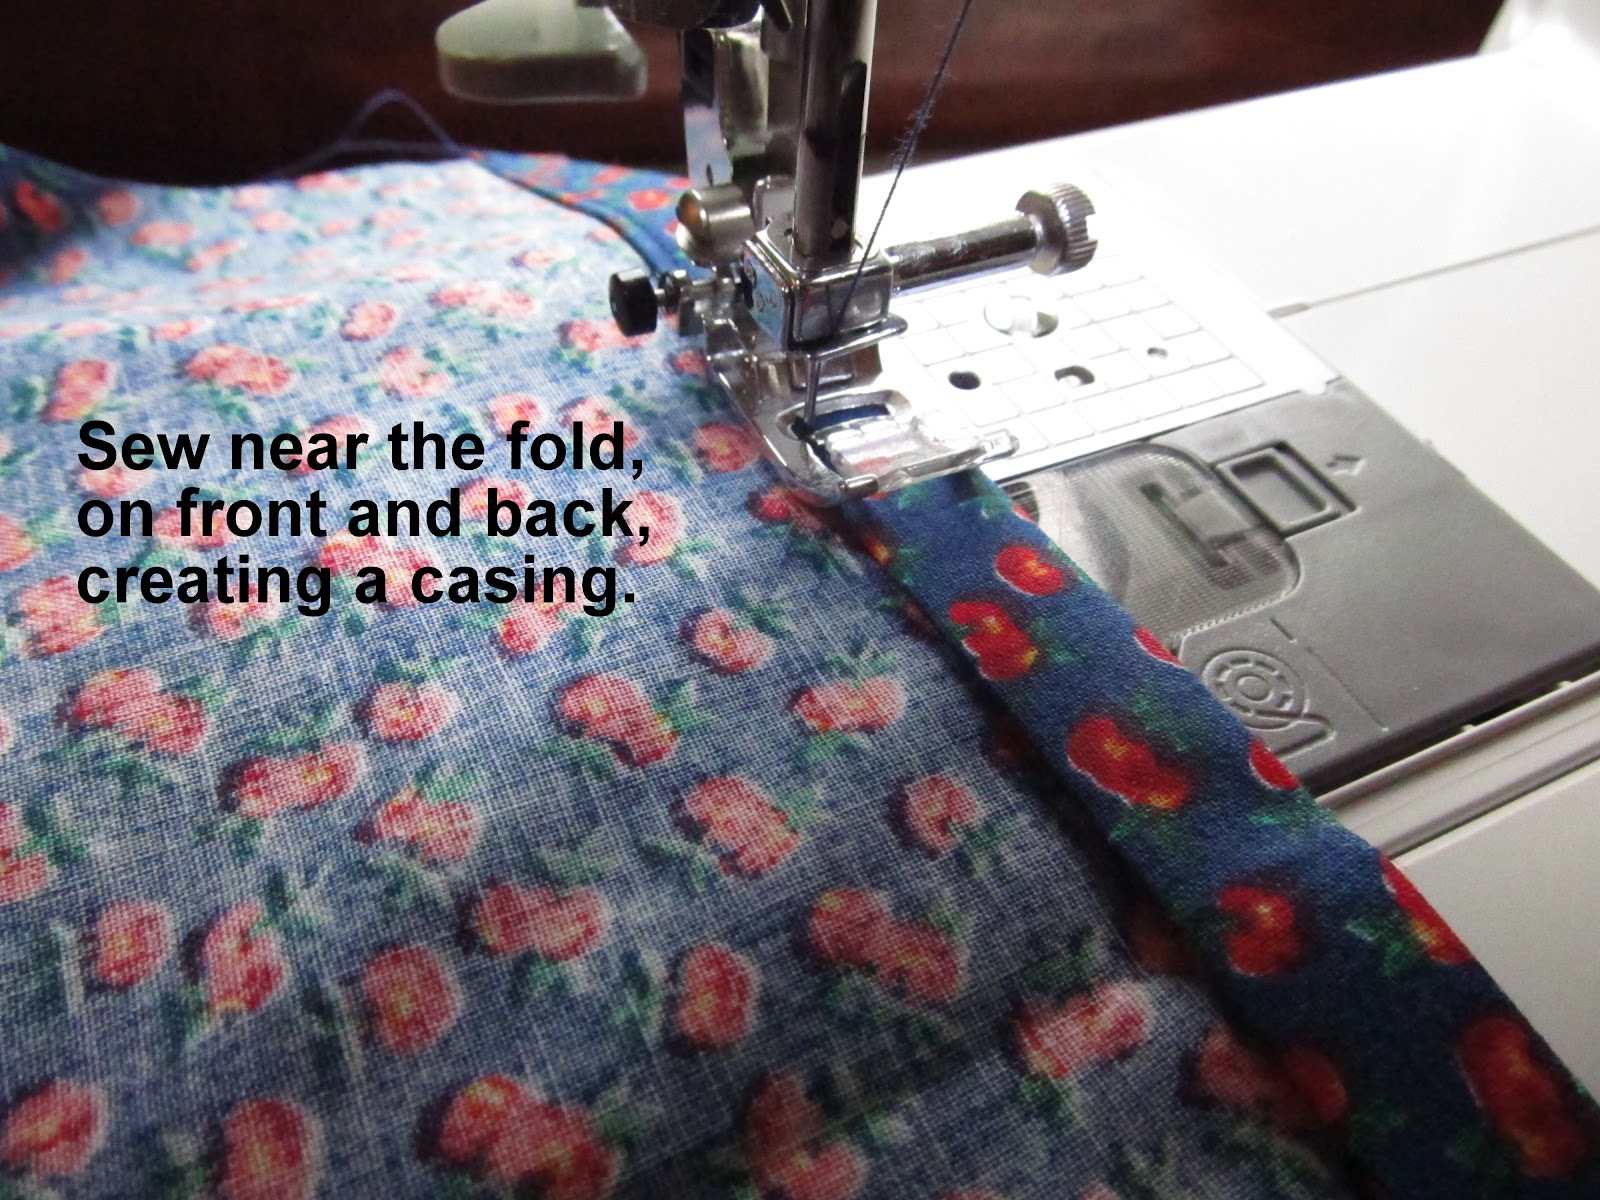
Now make your waistband. You can serge the edge or fold it over 1/4" for a clean finish. Then fold over 1", pin or press it in place, and then stitch. Don't forget to leave about an inch or so gap so that you can put the elastic in.
For the hem, fold over 1/2", then again, and stitch.


Measure you elastic on your model. Make sure to make it a little tight so that the shorts don't fall down but not too tight. Using a safety pin, pull the elastic through the waistband, being careful not to twist it. Hold on to the opposite end so that you don't loose it. That's never fun. Stitch the two ends of the elastic together and then stitch the gap closed. I like to sew a tag with the size in the gap. If you don't have a tag you can use a ribbon to signify the back of the shorts.


A handy little trick for keeping the elastic from rolling is to stretch the waistband out and sew through all the layers. Make sure you have the gathers evenly distributed before you start or it might not all match up like you want.


If you want to make a pair of pants the idea is the same, just make the legs longer.

And here is my goofy, ratty-haired, Kool-aid smile model. Hey! It's summer. ;)


Wednesday, May 8, 2013

The Apple Dress Updated

Do you remember this cute dress we made last year? Find it here: The Apple Dress

It's hard to believe how much my girls have grown in a year. I pulled out our dresses and now they work as shirts. I think it is even more incentive to make this dress, knowing that it can be used again.
Isn't it just cute? I got twin #2 to cooperate for me too!


Monday, April 1, 2013

The Perfect Princess Purse


I have four daughters, and even if my oldest will have nothing to do with anything "girly", we can never have too many purses. This adorable little purse took no time at all to make. I cannot take credit for the idea. I forget where I first saw the idea but when I went searching recently I could not find any directions for it. Here is how I made it.


Supplies:
2 pieces of fabric, 11"x 7"
2 circle bracelets

 You should have 2 pieces like this. Turn them over so that they are facing right sides together.

Now make a mark 3 inches down from the top on both short sides.

 Stitch about 1/2" from the edge, from one mark, all the way around to the other mark. Make sure to backstitch really well at the beginning and the end. This part will see a lot of wear.

You should have this. (Look really closely. I know it's hard to see.)

Turn your purse inside out and press the top edges over about an inch. You can press the raw edge under again about a 1/4".

Take your bracelets and fold one edge over one bracelet and hand stitch.

Here is the method of stitching that I used. I wanted those straight lines on the front. You can use whatever you want. Whatever holds it down will work.

Sewing around the bracelet can be a little tedious. I found it helped to hold it like this for the stitching.

Sew all the way to the end and tie a knot. Repeat for the other side and you are done!

See! What little girl wouldn't love this? It can even be worn on the wrist or arm like a bracelet.


Wednesday, July 18, 2012

Sewing Class: Drawstring Backpack

This backpack is super easy and quick to make. I think it would be
great for putting gifts in instead of gift bags. Can't you just see yourself
as "that" mom? The one with the most creative gifts that everyone compliments you on? I can.
Enjoy!


Tuesday, June 5, 2012

Sewing Class: The Apple Dress

  One of the perks of having four daughters is that I get to sew a lot of dresses. I would like to share with you one of my favorite dresses. It is super easy and takes very little time to make. If you are familiar with the pillow case dress, it is the same basic idea. I like to make mine with regular fabric so that I can make it any size that I want. (The measurements given are for a size 12m.)